If you own an RC car or a drone and a 3D printer, you’re sitting on a combination that most hobbyists haven’t fully figured out yet. I’ve been building RC vehicles for years, drones, cars, planes, all of it, and when I finally had a 3D printer in the garage, the first thing I wanted to do was start making parts. The problem is that most people either go too ambitious too soon (trying to print a full working chassis before they understand which filament to use for what), or they dismiss the idea entirely because they think printed parts won’t hold up. Both mistakes cost you time, money, and at least one destroyed bumper.
The truth sits in the middle. 3D printing can genuinely transform your RC hobby, but only if you understand where it fits into the build. RC vehicles are always hybrid projects. You can print chassis components, body shells, wings, switch holders, camera mounts, and bumpers, but you still need the industrial bits like the motor, ESC, battery, bearings, and tyres to actually get moving. Once you accept that, the printer becomes an incredibly powerful tool rather than a magic solution.
Before You Start
A couple of things to sort out before you print a single layer. First, most functional RC parts need materials that are harder to print than basic PLA. ABS requires an enclosure and a heated bed, ASA is finicky about temperature, and Nylon absorbs moisture from the air, which ruins prints if you don’t store it properly. If you’re running a basic open-frame printer, you’ll need to think about upgrades or workarounds before you tackle the more demanding filaments. Second, if you’re printing parts for a drone, always do a careful weight check before fitting anything. Even a few extra grams can affect flight characteristics, and printed camera cages or mounts need to sit within the original weight budget. A postal scale and a notepad saved me several wasted flights early on.
Step 1: Know What You’re Actually Going to Print
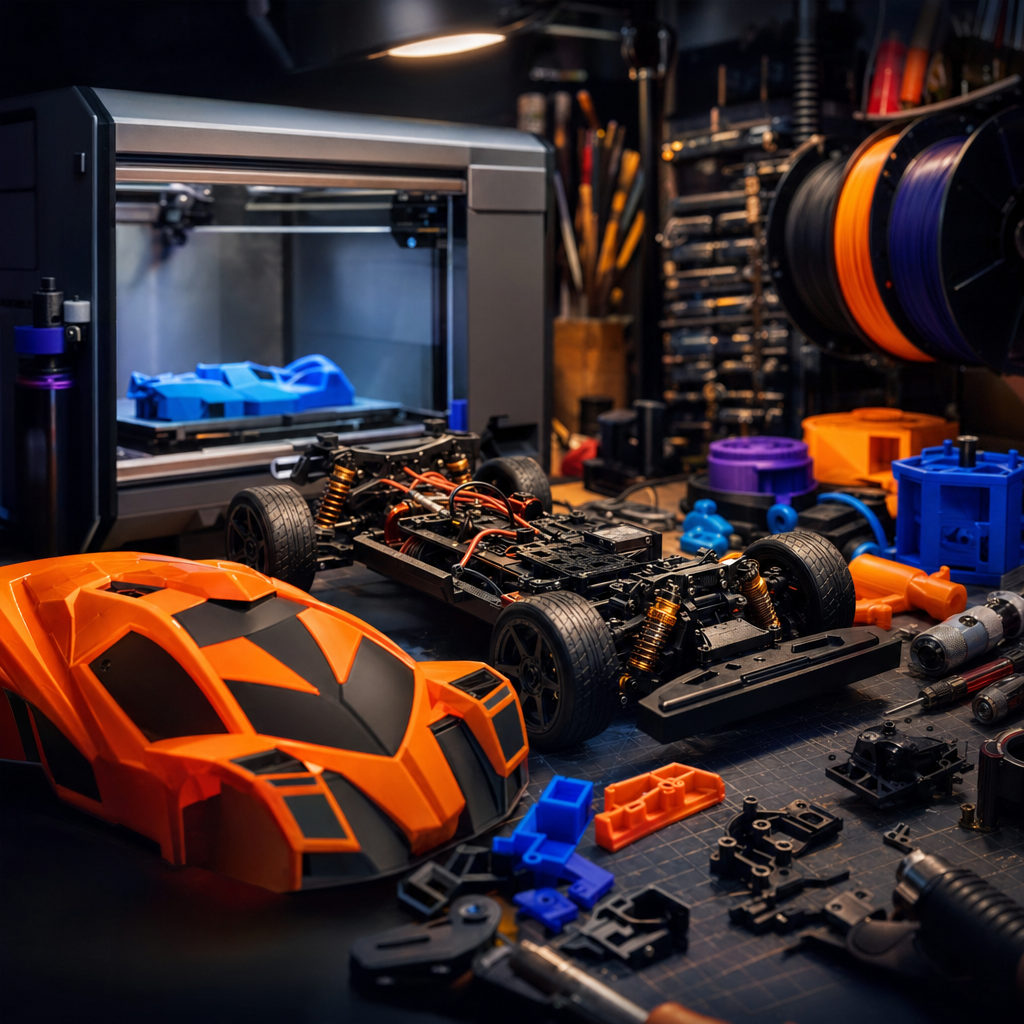
RC Cars
The good news is that hobbyists have successfully printed an enormous range of car parts: side skirts, wings and wing mounts, ESC mounts, switch holders, body panels, and parts trays are all well-established in the community. The body shell is one of the more satisfying projects, and also one where technique really matters. To get a body that looks good and performs well, you want to minimise weight and maximise surface quality. Print it vertically rather than flat on the bed; this gives you smoother curves and avoids ugly support scarring across the exterior. Keep your wall count down to one or two perimeters and your infill low, anywhere between zero and ten percent is reasonable. The goal is a low centre of gravity and a body that isn’t carrying unnecessary mass.
RC Drones and FPV Quads
For drones, the most common and genuinely useful printed parts are custom mounts and brackets, camera cages, antenna holders, and frame section replacements. The priorities here are durability and lightness, which sounds contradictory but isn’t. It’s mainly a filament choice question, which we’ll come to in a moment. Printed parts work brilliantly on drones because replacement is so easy. If a camera cage takes a hit, you print another one in twenty minutes rather than waiting a week for a part to arrive.
Step 2: Choose the Right Filament for the Job
This is the part that trips most people up, and it’s the area where getting it wrong is genuinely costly. Here’s the honest breakdown based on community consensus across RC forums and filament specialists.
PLA is the easiest to print and looks the nicest straight off the bed. It comes in a huge range of colours and has a lovely matte surface. But for functional RC parts, it’s a poor choice. It’s brittle, has no forgiveness on impact, and if your car sits in a hot boot on a summer day, PLA will deform. Use it for prototyping and checking fitment, not for anything that needs to survive real use.
PETG is considered the go-to for RC body shells. It strikes a good balance between flexibility and strength, which means it absorbs knocks rather than shattering. It also has better UV resistance than ABS, so colours stay truer for longer outdoors. The trade-off is that PETG is prone to stringing during printing and often needs a bit of post-processing. The finish is glossy, which can look different to what you expect if you’re used to PLA.
ABS is the material of choice for chassis components. It’s rigid, strong, and handles higher temperatures without distorting. That’s important for parts that sit close to motors or ESCs. The challenge is that ABS is genuinely difficult to print. It warps as temperatures fluctuate during the print, it produces fumes that aren’t great to breathe, and you absolutely need a heated bed and a proper enclosure. Don’t attempt ABS on an open-frame machine without one.
ASA is the version of ABS that was designed to live outdoors. It handles UV exposure and heat even better than ABS, and is arguably the most sensible all-round choice for body panels and any part that spends time in the sun. ABS-CF and ASA-CF composites (carbon fibre reinforced versions) push heat resistance up significantly, to around 98°C and 110°C respectively. That’s genuinely relevant for parts near hot running components.
TPU is the flexible one, and it’s brilliant for bumpers and tyres. It absorbs impact rather than cracking, handles temperatures up to around 80°C, and isn’t bothered by most chemicals it’s likely to encounter outdoors. It’s also worth using TPU for shock towers and other parts where vibration absorption matters. One warning: TPU is prone to stringing and can be awkward to print if you’re using a Bowden tube setup. Direct drive is much more reliable with flexible filaments.
Nylon and NylonX are for gears and high-stress components. Nylon is the best material for precision mechanical parts, but it’s the hardest to print. It warps, absorbs moisture rapidly, and doesn’t hold up well if stored carelessly. NylonX adds micro carbon fibres to nylon, which dramatically improves stiffness and reduces warping. One important note: carbon composite filaments are abrasive and will wear out a standard brass nozzle. Fit a hardened steel nozzle before you run any carbon-loaded filament through your printer.
A quick reference summary if you want it pinned above the printer:
- Chassis: ABS
- Body shell: PETG or ASA
- Bumpers: TPU or Nylon
- Wheels and tyres: TPU
- Gears and mechanical parts: Nylon or NylonX
- UV-exposed outdoor parts: ASA
- Prototyping only: PLA
Step 3: Source or Design Your Models
For most people, the starting point is finding existing models rather than designing from scratch, and that’s completely fine. Printables (Prusa’s community platform) and Thingiverse both have substantial RC sections. Search your specific car model or drone frame alongside terms like “mount”, “body”, “bumper”, or “cage” and you’ll usually find something usable. The RC community is generous with sharing files.
If you want to start designing your own parts, Fusion 360 has a free tier for personal use and is well suited to mechanical components. The key design principle for RC parts specifically is that material shrinkage varies between filaments. If a part was designed for PLA and you’re printing it in PETG, the fit may be slightly off because PETG shrinks differently. Either look for files that specify the intended material, or account for this in your slicer settings by adjusting the scaling percentage slightly.
For body shells specifically, if you’re working from scratch, keeping wall thickness consistent and avoiding sharp internal corners (which create stress points) will give you a much more resilient result.
If It’s Still Not Working
Parts don’t fit or align correctly. Check whether the original file was designed for a different filament and factor in shrinkage. ABS in particular shrinks noticeably. Try scaling the part up by one to two percent and reprint.
ABS or ASA keeps warping mid-print. You need an enclosure and a bed temperature of at least 90°C. Drafts are the enemy of ABS. Even a nearby window or an air vent blowing across the printer can cause layer separation.
TPU printing is a mess of strings and blobs. Slow your print speed right down. TPU often needs to run at less than half your normal speed. If you’re on a Bowden setup, consider whether you can temporarily switch to a direct drive configuration, because flexible filaments really do perform better with direct drive.
Wrapping Up
Once you match the right filament to the right part and get your settings dialled in, 3D printing becomes one of the most satisfying additions to the RC hobby I’ve ever come across. Broken bumper? Print a new one overnight. Want a custom camera mount or a wing that nobody else has? Design it yourself and have it in your hands by morning. It takes a little patience upfront to understand the materials, but that investment pays back quickly.
If you’re still hitting a wall after following the steps above, drop a comment below or bring it to the newsletter community. There’s always someone who’s hit the exact same snag and worked through it.
Want more like this in your inbox? I send out a weekly round-up covering 3D printing, RC builds, home tech, and whatever I’m currently breaking or fixing in the garage. It’s free, it’s practical, and it actually shows up on time. Sign up at techdadslife.beehiiv.com and I’ll see you in there.